How to Run Multiple OpenClaw Instances on One Machine (and Why Containers Win)
Zedly AI Editorial TeamApril 13, 20269 min read
OpenClaw is built for one user, one machine, one config directory. That works fine until you need a second instance: a separate project with different LLM providers, a dev environment alongside production, a team member who needs their own agent workspace on a shared server. The moment you try to run two OpenClaw gateways on the same host, things break in quiet, frustrating ways.
This article explains what goes wrong, compares the three common workarounds, and shows why containers are the clear winner for running multiple OpenClaw instances on one machine. If you want to skip the manual configuration entirely, Zedly Setup handles multi-instance deployments in a single session.
The Problem with Multiple OpenClaw Instances
OpenClaw assumes a single installation per machine. Its defaults reflect that: one config directory at ~/.openclaw/, one gateway port, one memory store, one cron scheduler. Running a second instance without changes creates collisions at every layer:
Conflict
What Happens
Symptom
Gateway port
Both instances try to bind the same port
EADDRINUSE error, second gateway refuses to start
Config directory
Both read/write ~/.openclaw/openclaw.json
Provider keys, model routing, and plugin settings overwrite each other
Memory store
Agents share the same persistent memory
One project's context bleeds into another project's agent responses
Cron scheduler
Scheduled jobs from both instances share the same crontab
Jobs run against the wrong instance or fail with lock conflicts
Plugin versions
Both instances share the same npm global packages
Upgrading a plugin for one project breaks the other
The core issue is shared state. OpenClaw was not designed with multi-tenancy in mind, and patching around these collisions manually is fragile. You can make it work, but every workaround adds maintenance burden and new failure modes.
Three Approaches (and Which One Wins)
There are three common strategies for running multiple OpenClaw instances on one machine. They differ significantly in isolation quality, maintenance cost, and reliability:
High: updates applied per-user, cron per-user, no unified view
Works, but painful
Port + config overrides
None: same filesystem, shared libs
Low: set env vars per instance
Very high: one mistake crosses wires between instances
Fragile, not recommended
Containers (Docker)
Full: filesystem, network, processes, resources
Medium: one Dockerfile, docker compose up
Low: each container is self-contained, rebuildable, disposable
Clear winner
The first two approaches fight against OpenClaw's single-instance assumption. Containers remove the problem entirely: each container is its own machine as far as OpenClaw is concerned, with its own filesystem, its own ports, and its own process space.
Why Containers Are Best Practice for Running Multiple OpenClaw Instances on One Machine
OS-level containerization gives you everything multi-instance OpenClaw deployments need, without any of the fragility of manual workarounds:
Complete isolation: each container has its own ~/.openclaw/, its own Node.js environment, its own installed plugins. No cross-contamination between projects.
Resource limits: set CPU and memory caps per container. A runaway agent in one instance cannot starve the others. Docker enforces these at the kernel level. With Zedly Shield's resource monitoring, you can track per-instance CPU and RAM usage over time to see exactly what each container consumes.
Independent versioning: pin OpenClaw to a specific version per container. Upgrade one project to the latest release while keeping another on a stable version that your production workflows depend on.
Reproducible setup: your Dockerfile captures the entire installation: OpenClaw version, Node.js version, plugins, config structure. Rebuilding from scratch takes seconds, not hours.
Clean teardown: done with a project? docker rm removes everything. No orphaned config files, no leftover cron jobs, no stale gateway processes.
Port mapping: each container's gateway runs on the default port internally. Docker maps it to a unique host port (-p 10005:3000, -p 10006:3000). No port override hacks needed.
Containers are not just for multi-instance setups. Even if you only run a single OpenClaw instance, a container is the recommended approach. It gives you a reproducible environment that survives OS upgrades, a clean uninstall path, version pinning, and resource limits that prevent a misbehaving agent from consuming your entire machine. Starting with a container from day one means you never have to migrate later when you add a second instance.
The overhead is minimal. Each idle OpenClaw container uses roughly 80-120 MB of RAM. A standard developer machine with 16 GB can comfortably run 4-6 instances with active agents. On macOS, OrbStack runs Linux containers with near-native performance: file I/O, networking, and process startup are effectively as fast as running directly on the host. If you have been avoiding Docker on Mac because of the performance tax, OrbStack removes that objection entirely.
Getting started on a Mac takes two commands:
# 1. Install OrbStack (Docker alternative for macOS)
brew install orbstack
# 2. Pull and run the Zedly Setup image (OpenClaw + Shield pre-installed)
docker run -d --name openclaw-1 -p 10005:3000 ghcr.io/zedly-ai/setup:latest
That gives you a fully isolated OpenClaw instance in under a minute. Need a second instance? Change the name and port:
docker run -d --name openclaw-2 -p 10006:3000 ghcr.io/zedly-ai/setup:latest
Each container is fully independent from the moment it starts. Its own config, its own gateway, its own plugins. You can run one openclaw instance as production and the other as experimental/testing.
On Windows, WSL2 gives you the same story. Docker Desktop runs containers on a real Linux kernel under Hyper-V, so CPU, memory, and file I/O inside the container are near-native Linux speed. The same docker run command works identically.
The one thing to avoid: mounting Windows folders (like /mnt/c/) into the container. The cross-filesystem bridge is slow. Keep OpenClaw's working files inside the container where they belong, and performance matches a bare Linux install.
What a Multi-Instance Setup Looks Like
In practice, each OpenClaw instance runs inside its own container with a dedicated gateway port, config directory, and (optionally) its own Zedly Shield daemon for runtime security. A typical multi-instance deployment on one machine looks like this:
Instance
Container
Host Port
Purpose
Model
Project A
openclaw-projecta
10005
Contract analysis (production)
GPT-5.4
Project B
openclaw-projectb
10006
Daily data extraction (cron)
Gemini 2.5 Flash
Dev/Test
openclaw-dev
10007
Agent development and testing
GPT-4o-mini
Each container has its own openclaw.json with provider keys, model routing rules, plugin configs, and memory paths. Changes to one instance never affect the others.
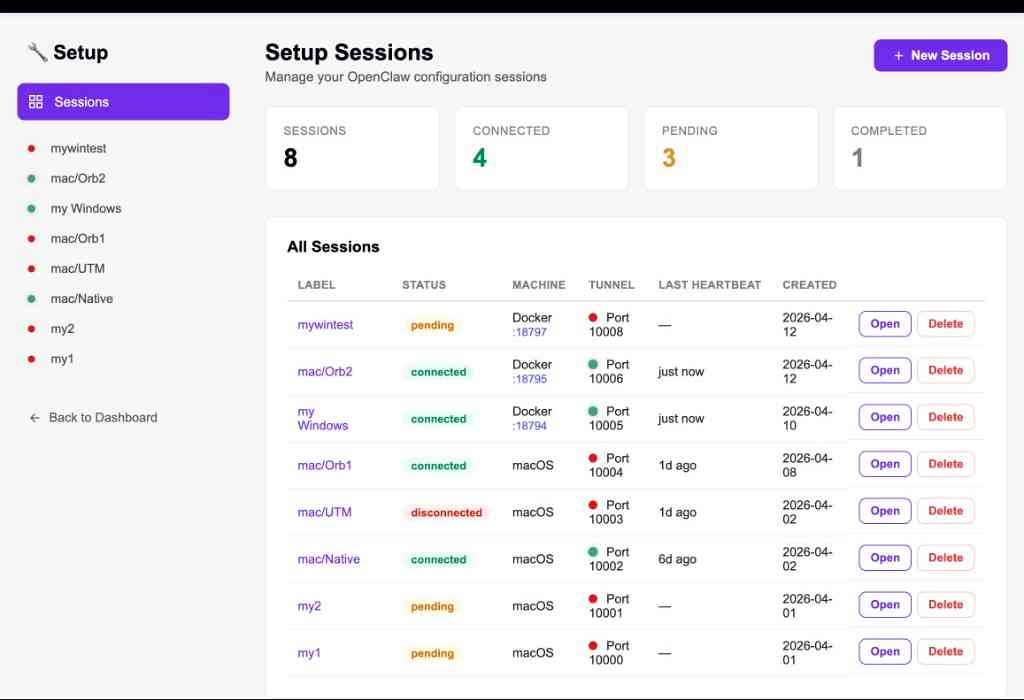
The Zedly Setup dashboard reflects this architecture. Each session targets one instance, whether it runs in a container or on bare metal, on macOS or Linux. The dashboard tracks every session's status, connection health, and machine type:
The Setup Sessions dashboard managing multiple OpenClaw instances across Docker containers and macOS hosts. Each row is one instance with its own tunnel, heartbeat, and configuration session.
Notice the mix of Docker containers (with mapped ports like :18794, :18795, :18797) and native macOS instances. Several of these are running via OrbStack on Mac, where containers perform identically to bare-metal installs. The setup process is the same regardless: create a session, run the tunnel command, and the engineer configures that specific instance. For teams running budget models on some instances and frontier models on others, each container gets its own routing rules optimized for its workload.
What Zedly Setup Configures for Multi-Instance Deployments
Each Zedly Setup session targets one instance via a secure reverse SSH tunnel. For containerized deployments, the setup engineer enters each container in turn and configures it independently. Here is what gets handled per instance:
Item
Per-Instance Configuration
LLM Providers
API keys configured and verified. Shared keys for unified billing, or separate keys for per-project cost tracking.
Model Routing
Each instance gets routing rules matched to its workload. Production uses frontier models; dev/test uses budget alternatives.
Gateway + Ports
Container port mapping verified, gateway starts cleanly, no conflicts with other instances on the host.
Shield Daemon
Zedly Shield installed per container with instance-specific deny lists and audit log paths.
Cron Scheduling
Scheduled jobs configured inside the container. No conflict with cron on the host or other containers.
Config Backup
Working openclaw.json snapshot saved per container. Restore point if an update or config change breaks something.
The engineer verifies each instance end-to-end before moving to the next: providers respond, the gateway starts, a test agent runs, and Shield logs the event. No instance is left half-configured.
Security Across Instances: Why Shield Matters More with Multiple Agents
Running multiple OpenClaw instances multiplies your attack surface. Each instance has its own agents with shell access, file system control, and connections to LLM providers. Without per-instance guardrails, a prompt injection or misconfigured agent in one container can exfiltrate data through its own model connection, completely independent of what the other instances are doing.
Zedly Shield runs as a local daemon inside each container, sitting between the agent and the LLM provider. Each instance gets its own security boundary:
Per-instance PII redaction: credit card numbers, SSNs, email addresses, and phone numbers are detected and stripped before data leaves the container. Each instance's redaction rules are independent.
Per-instance deny lists: define blocked keywords, file patterns, or topics per project. A contract analysis instance blocks client names; a dev instance blocks production database credentials.
Per-instance audit logs: tamper-evident JSONL logs record every tool call, every policy decision, and every redaction event. Each container's log is self-contained and exportable.
Fleet dashboard: the optional cloud dashboard aggregates events from all containers into a single view. One screen shows which instances triggered policy violations, which agents accessed sensitive files, and which redactions fired.
Per-instance resource monitoring: Shield tracks CPU and RAM usage for each container's gateway and agent processes over time. Spot a container that is consuming more memory than expected, or catch a CPU spike during an agent run that suggests a runaway loop. This is especially valuable with multiple instances: you can compare resource profiles across containers and identify which workloads need higher limits.
Shield's resource monitoring tab shows per-agent CPU and RAM usage over time. Each container gets its own metrics, so you can track exactly what each OpenClaw instance consumes.
Without Shield, multi-instance deployments create blind spots. You might secure one instance carefully while another runs unmonitored. Per-container Shield daemons ensure every instance has the same baseline protection and resource visibility, regardless of who configured it or when it was created.
Frequently Asked Questions
Can I run OpenClaw in Docker?
Yes, and it is the recommended approach even for a single instance. Each container gets its own filesystem, ports, and configuration directory. You install OpenClaw the same way you would on a bare host (the official curl one-liner), then configure providers, plugins, and the gateway inside the container. The gateway port is mapped to a unique host port so multiple containers can run simultaneously without conflicts. On macOS, OrbStack runs Linux containers with near-native performance, so there is no speed penalty compared to a bare-metal install.
How many OpenClaw instances can one machine handle?
It depends on your hardware and workload. Each idle OpenClaw gateway uses roughly 80-120 MB of RAM and negligible CPU. The real resource consumption comes from active agent runs: tool calls, browser automation, and file operations. A machine with 16 GB of RAM can comfortably run 4-6 active instances. For heavier workloads, set memory and CPU limits per container to prevent one runaway agent from starving the others.
Do I need separate API keys for each OpenClaw instance?
Not necessarily. You can share the same API keys across instances if you want unified billing. However, using separate keys per instance gives you per-project cost tracking, independent rate limits, and the ability to revoke access to one instance without affecting the others. For production deployments, separate keys are the safer choice.
Can Zedly Setup configure all my instances in one session?
Each Zedly Setup session targets one machine via a reverse SSH tunnel. If your instances run as containers on the same host, the setup engineer can configure all of them in a single session by entering each container in turn. The session dashboard shows each container as a separate entry so you can track progress across all instances.
Does Zedly Shield work inside Docker containers?
Yes. The Shield daemon (shieldd) runs inside each container alongside the OpenClaw gateway. Each container gets its own Shield configuration, its own deny lists, and its own tamper-evident audit log. The optional cloud dashboard can aggregate events from all containers into a single fleet view, so you monitor every instance from one place.
Skip the Multi-Instance Config Maze
The Zedly Setup Assistant configures all your OpenClaw instances in one session. Containers, ports, providers, model routing, Shield, cron, backups: verified working before the session ends. No manual Docker debugging. No cross-instance config collisions.
14-day free trial, no credit card: spin up your instances in Docker and configure them before you pay
One session, all instances: the engineer enters each container and configures it independently
Full session log: every command logged and exportable